How to Adjust a Rifle Scope [2025]
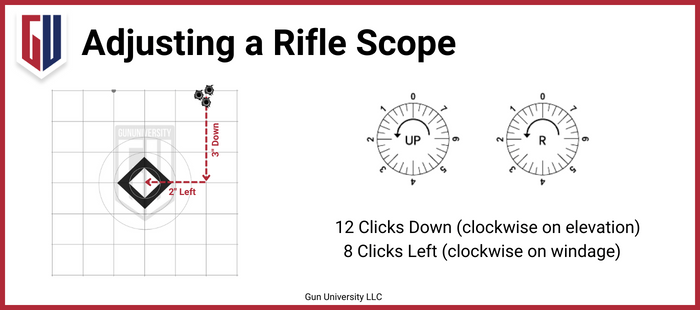
To make the most of your riflescope, you must know how to adjust it properly. That said, even if you have experience with a scoped rifle, there are some adjustments that you may not know about and these can help you be more effective with your riflescope.
In fact, some of these are settings that many of my sniper students had adjusted incorrectly. No matter where you are as a rifle shooter, you’re going to learn all about each of the adjustments on your riflescope and how to use them to turn yourself into a more effective rifle shooter. Let’s get started
In this guide on how to adjust a riflescope we’re going to cover:
- Elevation Adjustments (moving a bullet’s impact up or down)
- Windage Adjustments (moving a bullet’s impact left or right)
- Parallax (Target Focus) Adjustments
- Focusing the Eyepiece
- Magnification Adjustments
- Changing the Brightness of Illuminated Reticles
- Moving the Scope on the Rifle
But first, we need to cover some basic scope parts, terminology, and mechanics.
Basic RifleScope Parts and Terminology
Before we talk about how to adjust specific parts of the scope, it’s important to understand what those parts are and what they do. Starting from the rear of the scope and moving forward:
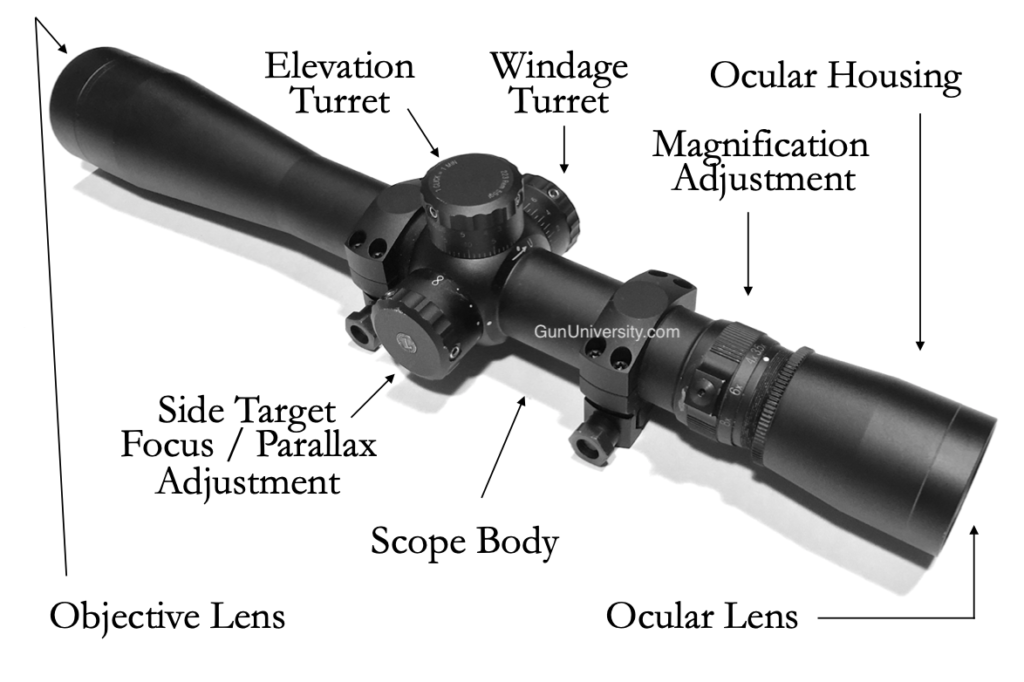
Ocular Lens: The lens closest to your eye when you’re looking through your scope. Do yourself a favor, ALWAYS use scope caps to protect your lenses and keep them clean.
Ocular Housing: The “eyepiece” of the scope that houses the ocular lens and, in most cases, the ocular focus adjustment.
Ocular Focus Adjustment: This mechanism adjusts the focus of the reticle (crosshairs) inside the scope to your eye. Some scopes turn the entire ocular housing for this adjustment, while others adjust only the outer section around the ocular lens.
Magnification Adjustment: On variable power scopes, this mechanism adjusts the magnification power of the scope.
Scope Body: The main part of the scope to which the other parts attach and the tube through which you look when aiming.
Turrets: Turrets are knobs on the scope used to adjust elevation and windage. They can be exposed, easily grabbed and adjusted, or capped, where a cap covers and protects the turret.
Reticle: The “cross-hairs” or reference point in the scope used for aiming. In modern long-range shooting scopes, the reticles can be quite busy with references for elevation and windage holds.
Parallax Adjustment / Target Focus: This adjustment aligns the target image with the reticle in the same focal plane, preventing parallax and ensuring clarity. Higher-end scopes feature a side focus or side parallax knob for this purpose. On other scopes, it’s adjusted around the objective lens by turning the outer ring, known as adjustable objective scopes.
Objective Lens: This is the lens facing the target and is often the larger of the two external lenses of a scope. Again, always keep a scope cap protecting this. Now that we’ve covered the basic parts of a scope, let’s dive into how to make adjustments to it.
How to Make Elevation Adjustments on Your Riflescope
To adjust the bullet’s impact up or down with your scope, use the “elevation” adjustment. This is crucial for “zeroing” the scope to your rifle or shooting at different distances.
“Zeroing” ensures your aim (POA) aligns with where the bullet hits (POI) at a specific distance. When mounting a new scope, zeroing is necessary. Shooting at different distances from your zeroed distance may lead to a higher or lower bullet impact.
Bullets drop once leaving the rifle barrel because it’s angled slightly upward to compensate. This causes the bullet to follow an arc to the target. To raise the bullet’s impact, adjust the scope’s elevation turret “up.”
Typically, raising the bullet’s impact involves rotating the turret counter-clockwise, while lowering it requires clockwise rotation. Confirm this with your scope. Each turret click corresponds to an angular measurement. Many hunting scopes adjust in 1/4 MOA (1/4″ per 100 yds). To learn more, check out Understanding MOA.
Example of Elevation Adjustment for MOA scope:
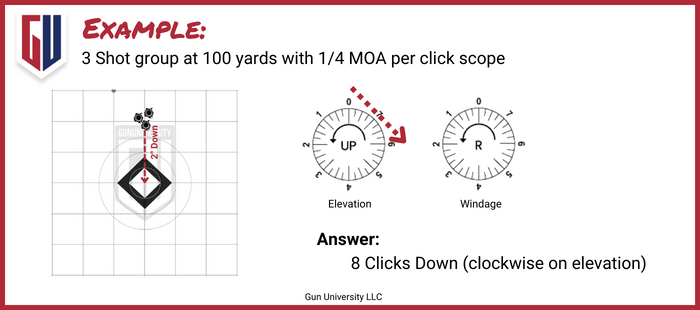
Pro Tip: If your scope has exposed turrets, you should be able to make elevation adjustments while your head is still in position looking through your scope. As a trick to remember the correct direction, think of the turret as a screw. To raise the screw “up,” you unscrew it counter-clockwise. Similarly, to lower the screw “down,” you’d turn it clockwise. Also, if you have capped turrets, don’t forget to put your caps back on when you’re done!
If you’re looking through your scope when you make this adjustment and you see your reticle moving down while e you’re adjusting “up” on your elevations turret, don’t panic. Your scope is not broken. By turning your turret “up,” the reticle must go down inside the scope so that you raise the rifle to get the reticle back on the target. This raising of the rifle, and thereby changing the barrel’s orientation, is what causes the bullet to impact higher. Here’s a video of me demonstrating this concept:
Windage Adjustments (moving a bullet’s impact left or right)
Just like elevation adjustments on a scope, windage adjustments shift the bullet’s impact when zeroing a scope or adjusting for shooting conditions. While elevation turrets control up and down changes, windage turrets adjust left or right impact.
Example of Windage Adjustment for a Scope:
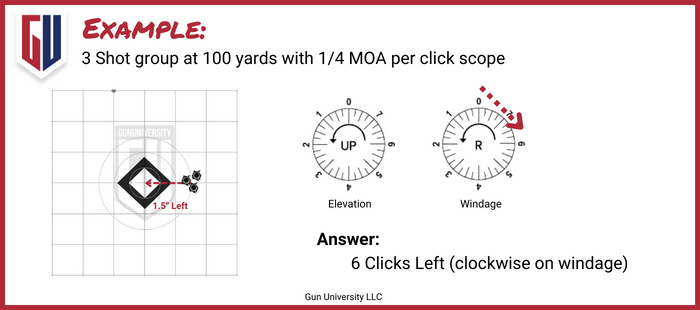
Typically, once my scope is zeroed, I rarely touch the windage turrets. Yes, wind can significantly move a bullet in flight (especially at distance), but I prefer to “hold” left or right (aim to the left or the right of the target – especially helpful with reference marks on the reticle) instead of making a windage adjustment with the windage turret. This is because the wind changes too quickly to re-adjust each time and I might forget to move the windage turret back to “zero.”
Pro Tip: Just like elevation adjustments on a scope, windage adjustments shift the bullet’s impact when zeroing a scope or adjusting for shooting conditions. While elevation turrets control up and down changes, windage turrets adjust left or right impact.
Parallax (Target Focus) Adjustments
Parallax is bad. It can cause you to miss a target if your head is not perfectly aligned each time you shoot. Let me explain… As an example, extend your left arm and raise your index finger. Now, with the right index finger, align it halfway between your eye and your left index finger. You should now be looking at two fingertips, at different distances, aligned with each other.
Now, without moving your fingers, move your head slightly from left to right. Notice how your fingers are no longer aligned as your head moves even though they didn’t change position? This relative shift is referred to as parallax. If this happened with your reticle and the target, your misaligned head might cause you to move the rifle to bring the reticle back in line with the target.
By moving the rifle, you’ve changed the orientation of the barrel, and thereby the path of the bullet = a miss. If your eye is focused on the reticle (it should be), then you can adjust the target focus to literally move the focal point of the image in the scope to be in line with the reticle. If the target’s image and the reticle are aligned on the same focal plane, not only will they both be in focus (no more straining with your eye to focus on one or the other), there will be no parallax effect. Win/win!
Pro Tip: Many people confuse “adjustable objective” for “adjustable parallax.” Getting scope with an adjustable parallax is desirable. However, having an adjustable parallax scope that has an adjustable objective instead of a side-focus/side-parallax knob is not. Therefore, some people mistakenly search out an “adjustable objective” scope on purpose when they should have been looking for a side-focus/side-parallax scope but somehow mistook the term “adjustable objective” to refer to all scopes with this adjustment feature.
Focusing the Eyepiece
The number one mistake I see on shooter’s scopes is an incorrectly focused eyepiece. This is because many shooters, even some of my professional sniper students, don’t even know this adjustment exists nor why it is so important to use. This means that there’s a good chance that this setting is wrong on your scope.
I was a special operations sniper in the military and I had the amazing opportunity to attend the Special Operations Target Interdiction Course (SOTIC), now called the Special Forces Sniper Course, the most prestigious sniper training available. This topic wasn’t covered there when I went through which is likely why none of us as snipers took the time to get this adjustment right and why most of my sniper students when I was a sniper instructor didn’t have it right either.
Thankfully, you’re going to know better and now do it the right way! I know my shooting in the military would have improved, or at least been easier, had I done this. If you’ve ever caught yourself having either a clear reticle and blurry target or a clear target and blurry reticle, then you know the frustration of trying to focus back and forth.
If you tried to adjust the target focus and it didn’t work, you also have likely experienced an improperly adjusted eyepiece. (also, my advice for better shooting is to only focus on the reticle anyway.) It is imperative that your scope is set up ad focused to that your eye can see the reticle clearly without straining. Only then can you bring the target image near the reticle and have both clear (and parallax free).
Steps to Focusing Your Scope’s Eyepiece:
- Once your scope is correctly mounted and positioned (forward/back) on the rifle, focus on a light-colored solid object nearby. This process is MUCH easier with a friend. If you don’t have any friends, stop reading and go find one.
- Get into a comfortable position behind your rifle. If you have to move your head to see through the scope clearly, you haven’t mounted your scope to fit you (see the video below for guidance).
- Have your friend (or person you hired to pretend to be your friend) hold up a white sheet of paper a foot or two in front of your scope for you to look at through the scope.
- Close your eyes and rest them for a few seconds.
- Open your eye(s), look at the reticle and then close them. Two seconds max! If you keep your eye open too long, your eye will strain to bring the reticle in focus and will defeat the purpose of this exercise.
- Have your friend adjust the ocular focus adjustment at least 1/2 revolution in one direction. On some scopes (like the one pictured above and in the video below) the entire ocular housing rotates to adjust the focus and is held in place with a locking ring. Whereas other scopes, like my favorite the Vortex Razor Gen II, there is a special adjustment ring around the ocular lens.
- Open your eye(s) again for only two seconds and simply say whether the image of the reticle looks better or worse.
- Keep repeating the exercise by turning the adjustment in both directions until a “sweet spot” is found where the reticle looks the best.
If you’ve done this correctly, your reticle and scope are now focused to YOUR eye and you will have less strain shooting and an easier time removing parallax errors. PRO TIP: If you’re the friend and the shooter’s answer of better/worse doesn’t make sense, trick them by not making an adjustment and asking them to look. If they’re not doing it correctly, you might get a different answer even without a change.
Magnification Adjustments
If your scope has adjustable magnification, you’ll typically find a ring just forward of the ocular housing used for adjustment. However, on some scopes like Nightforce, the entire ocular housing must be rotated to adjust magnification (a reason I avoid Nightforce scopes). Adjusting the magnification changes the size of the target image. Some scopes increase the reticle size proportionately to the target image, while others maintain the reticle size throughout the magnification range.
These two types of scopes are called First Focal Plane (FFP) and Second Focal Plane (SFP).
First Focal Plane: First focal plane riflescopes (FFP) adjust the reticle WITH the target image, enabling graduated markings for measurement at any magnification setting, ideal for range estimation using Mils. However, FFP scopes can be pricey and may have thick or thin reticles at extreme magnifications. If you’re serious about long-distance shooting, consider FFP scopes.
Second Focal Plane: Second focal plane (SFP) riflescopes adjust ONLY the target image while the reticle size remains constant. This is handy for maintaining a clear reticle but can cause issues if you use graduated marks on the reticle at the wrong power setting. For instance, Mil or MOA marks on your reticle usually match their true size at full power. If you lower the power, the image shrinks but the marks don’t – which can be problematic. However, you can adjust for this (e.g., at half power, marks are twice as big). SFPs are great for hunting scopes due to their robustness and visibility in low light and power. An exception is Nightforce scopes, which sometimes have a random dot on the power ring where the marks are accurate.
PRO TIP: STOP USING FULL MAGNIFICATION ALL THE TIME! Lower magnification often improves your shooting due to less perceived movement and focus on the reticle rather than the target. It also makes target finding easier.
Changing the Brightness of Illuminated Reticles
If you have a scope with an illuminated reticle, most likely you can also adjust the brightness of the reticle. On most scopes, this adjustment is on the left side of the scope and it differs from scope to scope – you’re going to have to reference your scope’s manual on this one. However, three pieces of advice when it comes to illuminated reticles:
- Always check that you turned it off when you’re done shooting. Although red dots scopes like the Aimpoint Comp M series red dot scopes can last for YEARS while on, that technology hasn’t made it to rifle scopes yet and the battery will likely be dead the next time you need it if you leave it on.
- Store an extra battery somewhere on or with the rifle. I like to put cheekpiece stock packs on all of my rifles and I store an extra battery there (for reasons from #1 above)
- When trying to shoot accurately, turn the brightness down. When it’s too bright, it can sparkle and make it difficult to be precise.
Moving the Scope on the Rifle
Having your scope properly adjusted on your rifle is crucial, though it’s not a typical “adjustment on your scope.” It should be addressed while mounting your scope on your rifle and before making any other adjustments to it.
Your scope and rifle must fit YOU for optimal performance. In my Long Range Shooting Handbook, I compared it to a race car driver who expected to drive a regular car well without adjusting the seat and mirrors. They may still outperform the average driver, but without the car set up for them, optimal performance isn’t possible. Here are three key areas to focus on when positioning your scope on your rifle.
- The height of the scope
- The forward/rearward position of the scope
- The rotational level of your scope
We’ll explore each of these three below, however, the video I shared above in the ocular focus section walks through each of these as well.
Adjusting the Height of Your Scope
If your scope isn’t at the right height, you’ll need to lift your head when you shoot. To check, rest your head’s weight on the cheekiest part of your stock with your eyes closed. Open your eyes to see through the scope.
If you can’t see through the scope, figure out if you need to raise or lower your head. If your head needs to move up (common), you’ll likely feel neck fatigue from previous sessions. Improve the height with quality scope rings or a cheekpiece stock pack, possibly adding insulation layers.
Adjusting the Scope Forward and Rearward
Only after your scope is at the right height, should you worry about the forward/rearward position. Get on your rifle in a comfortable position with your eyes closed. Once set, open your eyes and you should already be at the right height. If you are, move the scope forward and backward until the image is perfectly clear. If the scope is too far one way or the other, you’ll see a black fuzzy ring around the image called “scope shadow.”
Scope shadow is a GOOD thing – it is what lets you know that your eye is properly aligned behind the scope. But, you need the scope adjusted so that when you are properly behind the scope, you see zero scope shadow. This is another area where people will move their head to a position that can see clearly through the scope (instead of the other way around) and end up straining their neck. Also, if the scope is too close, you run the risk of smacking yourself on the eyebrow and getting a case of “scope bite.”
Don’t do this… it hurts.
PRO TIP: Check this setting first on low power to make it easy but always confirm on high power (less forgiving) before settling on a distance.
Leveling by Rotating the Riflescope
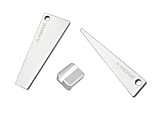
Now that your scope is the right height and the right distance from your eye, you need to confirm that it is level. I don’t buy into using bubble levels to level a scope. I think they give you a false sense of accuracy. And all too often when I find a shooter with a crooked scope, they used bubble levels.
Instead, I like to use a flat bottom of the scope to be mechanical level with the top of the rail. In the video above I use a flat piece of metal. But, that video was a few years ago and since then the idea of using the flat bottom of the scope has really taken off and some cool tools like this one now exist: Scope Leveling Tool If this was around when I made the video, I surely would have used it instead!
Having a level scope is important – you will ensure that your elevation adjustments are actually going straight up and you will have an easier time shooting with your rifle level (canting your rifle can cause you to miss as I demonstrate in the video).
Scope Adjustments Conclusion
We hope that you learned something about how to adjust your riflescope! Now, get your scope set up properly, get out to the range, and practice. Please let us know if this info helped in the comments below.
Long Range Shooting Handbook
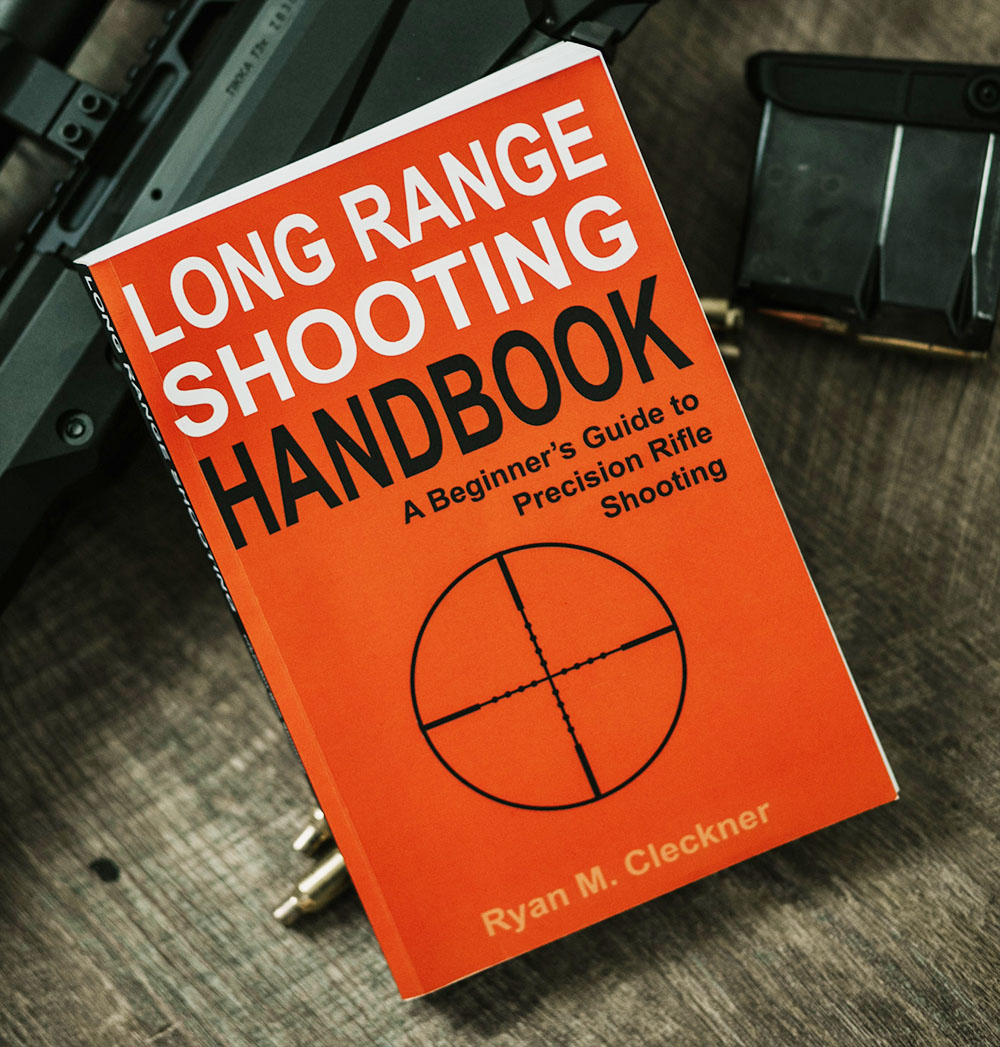
This book is the complete beginner’s guide to long range shooting written in simple every-day language so that it’s easy to follow.
Included are personal tips and best advice from Ryan’s years of special operations sniper schooling and experience, and as a sniper instructor.
Riflescope Adjustment FAQ
Q: What are the adjustment knobs on the top and side of the scope called?
A: The adjustment knobs on the scope are called turrets. The top turret is for elevation adjustments and the side knob is for windage adjustments.
Q: How much does a bullet move per click on my scope?
A: It is not possible to know how much a bullet’s impact will move for each click on your scope without knowing your particular scope. Your scope may adjust in MOA or Mil and in different fractions thereof. If you’d like help understanding these angular measurements, check out Understanding MOA.
Q: What is the front lens on a scope called?
A: The front lens of a scope, the one facing the target, is called the “Objective Lens”.
Q: What is the lens on the eyepiece of my scope called?
A: The lens on the eyepiece of your scope is called the ocular lens.
Q: Is a higher magnification scope better?
A: No, a higher magnification scope is not always “better.” You should have enough magnification to see the target but too much magnification can hinder your performance.
Q: What does the parallax adjustment do on a scope?
A: The parallax adjustment on a scope brings the focal point of the target’s image into the same focal plane as the reticle so that the two don’t shift with head position.
Q: What is the difference between First Focal Plane and Second Focal Plane scopes?
A: In First Focal Plane (FFP) scopes, the image AND the reticle grow and shrink together with magnification changes whereas with a Second Focal Plane (SFP) scope, only the image changes
Q: Is a First Focal Plane (FFP) better than a Second Focal Plane Scope (SFP)?
A: Neither an FFP nor SFP scope is “better.” If you’re primarily hunting and would like to save some money, get an SFP scope. If you’re getting into precision long-range shooting, especially with an advanced reticle, then look for an FFP scope.
Recent Posts
January 19, 2026
January 12, 2026
January 10, 2026
January 10, 2026

My brother wants to build his own rifle since he wants to improve his hunting accuracy, so he wants to start buying parts next week. It’s great that you elaborated on riflescope parts and how to protect its lens from dirt, so I’ll make sure my brother gets this information right away. Thanks for the insight on a rifle’s ocular lens and why we should use scope caps to keep them protected.
I think this is an excellent summary.
I shot a lot of target rifle (small and large calibre) from when I was 12 through college and county teams into my 20s. Still shoot some clay pigeon. But I am teaching my 11 year old son first via air rifles (because I think they are a great intro) then .22 ….. I was explaining scopes to him as I was taught 35 years ago, ‘When you put a screw into the wood, you turn clockwise and the screw goes further in and the impact point moves with it, when you unscrew it, the screw moves out and the impact point goes with it.’ Although the actual mechanics of it are in a way the reverse of that because you are not moving the point of impact down but the reticule up. But sometimes kids just hate listening to their parents so I found your site which I thought set it out as clearly as it can be and he read that and decided OK, dad might be right. So thanks for that.
You use very clear language and diagrams which is great for those new to the sport.
very clear and good article easy to understand. Thank you
I’m glad that you talked that it is necessary to consider your performance before the magnification. A couple of days ago, my best friend told me that he was looking for CZ scope rings that he would use for his hunting review, but he’s not yet sure where to buy them. Thanks to this instructive article, I’ll be sure to tell him that it will be much better if he consults a trusted arms dealer as they can provide more information about the products they are selling.
I liked how this post pointed out that a ring just forward of the ocular housing is used to adjust magnification. My brother recently found his fondness for shooting. He is even looking for CZ scope rings for an enhanced shooting experience.
thank you
Thank you for the most cogent explanations on elevation and windage. Windage adjustments have always been more difficult for me.
I use a Bushnell Bore Sighter to start after mounting a new scope or remounting a scope using new base and rings. The adjustments make sense with the sighter. Once at the range I’ve learned to not watch the reticule because I’ll always want to move it right to go right and vice versa.
Also, don’t skimp on quality optics especially if using heavy recoil weapons like a .45-70 or .375 H&H Mag. I might as well have taken my money from buying bargain optics and just flushed it down the toilet.
Thanks for the kind words, Mark!
Awsome. Learnt heaps. Thought I had scopes sussed untill this artical. Once the rain and wind stops, me and my scope are doing a bit of fine tuning. Thanks great artical, explained clear and precise. Totally worth the read. THANKS HEAPS
Awsome. Learnt heaps. Thought I had scopes sussed untill this artical. Once the rain and wind stops, me and my scope are doing a bit of fine tuning. Thanks great artical, explained clear and precise. Totally worth the read. THANKS HEAPS
Was in the Military and had shot many years with BUIS. Have recently purchased a Nikon scope and would get confused when adjusting, which way to turn the currents. Thanks for “Left out and Right back”. Didn’t have a problem with elevation, counter to open (up) clock to close (down) Your posting gives excellent advice, 5 Stars worth!
Happy to hear we helped!
just plinkin but ya…I always wondered about all that and man what a diff
This is by far the best advice I’ve found on the ‘net for scope mounting and adjusting. It changed some of my bad habits that I have accumulated over the years and I intend to forward it to my shooting buddies. I recently changed barrels (and calibers) on my AR, and found I couldn’t hit anywhere on my target after what I thought were sound adjustments. Seems I had the scope canted just enough to really be a significant amount off at 100 yards. I used a solid rest, level, and a plumb bob line at about 25 yards to find my error! After that, smooth sailing!
Oh, and thank you for your service.
Don Mangum
Awesome – glad we helped!