

How to Sight In A Rifle Scope: Zeroing Made Easy

After you’ve mounted a scope onto a rifle , you’ll need to go to the range to sight in the scope to your rifle (sometimes called “zeroing” your scope or rifle).
There are plenty of techniques to sighting in a riflescope – some are great, and some are a waste of time and money. As a sniper instructor, I’ve helped hundreds (thousands?) of shooters zero their rifle scopes and I’ve seen them all.
In this article on how to sight in a rifle scope we’re going to explore the best techniques and tricks I’ve used over the years to zero your rifle scope, or even your red dot sight or iron sights.
Steps to understanding and zeroing a scope:
What is “Zeroing” or “Sighting In” a rifle?
Sighting in a scope involves moving the scope’s reticle (what you use to aim – usually “crosshairs” but this also applies to a red dot, reflex sight, holographic sight and iron sights) so that your point of aim (where you aim on the target), is the same as your point of impact (where your bullet hits the target) at a certain distance.
That might sound complicated, but the process for zeroing a rifle is actually quite simple.
Basic Parts for Sighting a Scope
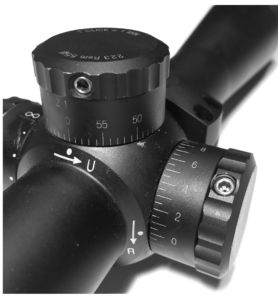
Before we cover how to make each scope adjustment, we need to cover the basic parts of your optic. For the purposes of how to sight in a rifle scope, we will be covering the elevation turret (the knob on top of the scope used to compensate for bullet drop – up and down) and the windage turret (the knob on the right side of the scope used to compensate for windage – left and right).

If you’re using iron sights, especially on an AR-15, the rear sight typically adjusts left and right for windage and the front sight adjusts up and down for elevation.
Elevation Turret:
The turret on the top of your scope will adjust the impact of the bullet on the target up or down. This is called “elevation.” The elevation turret (the knob you adjust) will be marked with a direction arrow – this arrow refers to the bullet’s impact and NOT the direction the reticle moves. So, if your shot group ended up being lower than where you were aiming, you’d move the elevation turret up.
Windage Turret:
The knob on the right side of your scope (99% of them) is the windage turret and it adjusts the impact of your bullet left or right. Like the elevation turret, you move it towards the target. So, if your shot grouping is left of the target, then you move the windage turret right.
Scope adjustments: Which Way to Turn
BEFORE you go to the range to zero your rifle, please do the following:
- Ensure the scope is mounted on the rifle to fit you (proper eye relief, etc)
- Focus the ocular focus setting to your eye
- Take the time to familiarize yourself with your scope and the adjustments necessary to zero the scope to your rifle
- Double check that your scope is properly secured to your rifle (I’ve made this mistake before)
For each of the items on the checklist above, and for actually sighting in your rifle scope, you’re going to need to be familiar with different scope adjustments. For a more in-depth discussion on your scope’s adjustments, check out How to Adjust Your Rifle Scope .
For help mounting your scope, check out our guide here.
Which Way to Turn:
For elevation, most scopes adjust “up” by turning the elevation turret counter-clockwise. For windage, most scopes adjust “right” by turning the windage turret counter-clockwise.
However, your scope’s turret, after you unscrew the caps, should look like the below.

Therefore, the rule of thumb is that you need to move the turret in the direction you want your shot grouping to move.
So, if your shot grouping it high, then you will need to turn the elevation turret clockwise. If your shot grouping is left of the target, then you will want to turn the windage turret counterclockwise.
Units of Adjustment:
There are two main units of Adjustment when it comes to zeroing a scope: MOA and Mils.
You will need to look at your scope to find out which one it operates under and we recommend you get very familiar with the one your scope uses.
- Learn how to adjust in MOA with this guide
- Learn how to adjust in MIL with this guide
For example, if you are using a MOA scope, then your adjustments will look something like this (and the article above will teach you how to calculate those clicks):

However, if you are using a MIL scope, your adjustments will look something like this (and the article above will teach you how to calculate those clicks):

The point is this: You need to understand how your scope adjusts before you start the next section…
Steps to Sighting in Your Rifle
Now that you know the basic parts of a scope and how to adjust your scope, let’s cover each of the steps on how to sight in a scope.
Steps to Zeroing in a Scope:
- Bore sighting
- 25-Yard Zero
- 100 Yard Zero
- Slipping Scales (zeroing)
I run through each of these steps to sighting in your rifle in this video here:
Step 1: Bore sighting
Bore sighting is an extremely crude, yet effective, method to start sighting in your rifle. The basic premise to bore sight your rifle is to look down your rifle’s barrel (the “bore”) and aligning the scope’s reticle to wherever the barrel is pointing at 100 yards.
To start, take extra care to ensure that your rifle is well supported and completely stable. Then, after removing your bolt, look down your barrel at something that is easy to see/identify at 100 yards. If you’re using an AR-15 style rifle, you can still do this by removing the rear takedown pin and pivoting the upper receiver so that you can see down the barrel, with the bolt carrier group removed.
Next, move your eye up to the scope without moving the rifle and adjust the reticle until it aligns with what you see through the barrel. It will likely take you a few times of moving your head from the barrel to the scope, to get this right.
Step 2: 25-yard zero
If you’re really confident, or short on time, you can skip this step but I don’t recommend it.
A 25-yard zero is as simple as this: shoot at a target 25 yards away and make an adjustment so that your impact would have been about an inch lower than where you were aiming. I write ‘about” because we’re not going for a perfect zero here – instead, we’re just ensuring that your bullet’s impact will at least be on the paper at 100 yards.
INSERT EXAMPLE of 25 yard 1 in.
By skipping the 25 yard zero, you might waste rounds at 100 or 200 yards (whichever distance you choose) if they don’t impact the paper, and therefore you don’t know which way to adjust.
Regardless if you’re dealing with a Minute of Angle scope, or a Milliradian scope, please remember that your adjustments for 25 yards will be four times as much as they will be at 100 yards. For example, moving 1 inch at 100 yards would be about 1 MOA. However, moving 1 inch at 25 yards is 4 MOA. This is because 1 MOA is about 1″ per 100 yards, and is therefore only 1/4″ at 25 yards.
Step 3: 100 Yard Zero
The 100 yard (or meter, of course) zero is going to be your final/actual zero to sight in your scope to your rifle.
When you’re ready to zero your rifle, you should ONLY shoot groups of bullets. Only by shooting groups of 3 or more bullets can you get a trend from which you can adjust.
After you’ve taken your time and made at least the best 3 shots you can make at your 100-yard target, determine the center of your group amongst each bullet hole, and make the appropriate adjustment to wherever you were aiming.
If using an MOA scope at 100 yards, you’ll determine how many inches the center of the group needs to move (up/down and left/right) and then make the appropriate adjustments on your scope. With a 1/4 Moa per click scope, you’ll need to adjust 4 “clicks” per MOA.
If you’re using a Mil scope, you’ll need to determine the number of centimeters to adjust your group and then adjust that many tenths of a Mil on your scope for the appropriate direction.
Practical Example:
If the center of your three shot group at 100 yards is 3 inches high and 2 inches left, you will need to come down 3 MOA and Left 2 MOA. Remember 1 MOA is about 1 inch at 100 yards.
If your scope adjusts in 4 clicks per 1 MOA, then you will need to come down 12 “clicks” for the 3 MOA adjustment and 8 “clicks” for the 2 MOA adjustment.
Always adjust the way you want the group to move – in this case, you’d adjust down and left.
Once an adjustment has been made, shoot another group to confirm. If you’re all set, you can move on to the next step. However, if you need to adjust again, make the adjustment and shoot another group to confirm as needed until the dead center of your group is aligned with where you are aiming.
To make this process easier, we made targets with a grid reference to help you know how much to adjust for each distance. On our rifle zero targets, we included the adjustments needed on your scope for a certain spot on the target, depending on how far away you are when you shot it.
Step 4: Slipping Scales (Zeroing)
The final step is to “slip your scales”, or zero your scope, if that adjustment is available on your scope.
This step involves moving the turret so that the “0” on the turret, aligns with the indicator mark on your scope so that if you make an adjustment in the future, it is easy to get back to your “zero.”
On most scopes, this involves loosening three hex-head screws on the outside of the turret, turning the turret until the “0” is aligned with the reference mark, and then retightening. It is VERY important to ensure that the actual adjustment in the scope (the “clicks”) is not moved as you turn the cap – the turret should freely spin.
Once set and tightened, the reticle and turrets on your scope will be zeroed to your rifle.
Things to Avoid when Sighting in a Rifle
Just as there’s a right way to sight in a rifle scope, there’s also a wrong way to zero your rifle.
Of course, this is my opinion, but… isn’t that why you’re reading this article?
Laser Bore–Sighting: In my unvarnished opinion, laser bore sighters are junk. Don’t waste your money or your time.
I’ve seen countless examples of shooters trying to use these and I’ve never seen them work. Want to zero your rifle scopethe right way? Watch the video and read the description above.
Starting at 100 yards: Yes, I’ll be a hypocrite here. You should not start at 100 yards even though I have. Starting at 25 yards saves time, ammo, and frustration when you can’t even tell where your bullets are impacting at 100 or 200 yards.
Making Adjustments after 1 Shot at Distance: If you decide to shoot one shot at 100 or 200 yards and then make an adjustment, you’re going to waste time and ammo. SHOOT A GROUP before you adjust at distance.
If you shoot one shot then adjust, another shot then adjust, you’re going to be “chasing” your bullet impacts all over the target and get frustrated.
Instead, even if you see you first shot is not where you were aiming, shoot at least two more to get a good sampling before making an adjustment.
Failing to “Slip Scales”: I get it… it might be a pain to slip your caps so that “0” is lined up when your scope is zeroed. But trust me, two years from now you’ll be thankful you did because you won’t be wondering where you scope is adjusted.
Long Range Shooting Handbook
This book is the complete beginner’s guide to long range shooting written in simple every-day language so that it’s easy to follow.
Included are personal tips and best advice from Ryan’s years of special operations sniper schooling and experience, and as a sniper instructor.
Cheat Sheet
- Always start with a properly mounted scope that fits you and the rifle
- Bore sight is optional but handy
- Shoot one round at 25 yards and adjust impact to be about 1 inch low of aiming point
- Shoot at least a three round group at 100 yards and adjust from the center of the group
- Measure inches of adjustment and move the number of “clicks” needed for the adjustment (multiply number of clicks per MOA, or clicks per inch, on your scope by the number of inches to move)
- Slip your scales so the turret reads “0”