How To Use A Red Dot: A Practical Guide
Red dots rule! They dominate the optic market currently, with high-quality red dots being produced by nearly every major optics company. Red dot optics come in all sizes, shapes, and designs. Red dots are at home on nearly any weapon. They can are perfect for carbines, shotguns, or even handguns. Heck, you can shove them on trap guns, lever-action brush guns, and big bore revolvers. If it goes bang, it can likely be improved with a red dot.
My Favorite Red Dots
Below I have listed my favorite Red Dots for difference scenarios and why I chose this option.
- Sig Romeo 1 Pro – For Handguns
- Holosun 507K – For Subcompact Handguns
- Holosun 507C – For Shotguns
- Aimpoint T2 – For Carbines
What’s a Red Dot?
Oh man, I might have gotten ahead of myself. Let’s explain what a red dot is. A red dot is a firearm’s optic (although they work on bows, too) that are very simple. These optics are designed for close to moderate range shooting. From 1 foot to 200 yards or so, a red dot does very well. Red dot optics gain their name because they use a red dot as the reticle.
It’s superbly simple but very practical and easy. When the optic is properly zeroed, it’s as simple as putting the dot on the target and pulling the trigger. I won’t dive too deep into the technology, but they function very simply. An LED emitter sits inside the optic and shoots forth a red beam of light that gets caught on the front lens of the optic.
The light is reflected on the optic, and the reason why is that a special coating is applied to the lens. This coating only reflects red light and lets other colored light pass through without issue. Lots of red dots have a noticeable tint that’s bluish in color; this helps brighten the dot and make it appear more vivid and clear.
Favorite Red Dots by Type
 |
| Check Price | |
 |
| Check Price | |
 |
| Check Price | |
 |
| Check Price |
How to Use a Red Dot
Below I have outlined my procedure in how to use a red dot. I go through my tips and ticks, the process of Mounting a Red Dot, Zeroing in your Red Dot and also looking at using red dots in a Practical Application.
Step One – Mounting
Mounting a red dot can be simple or slightly complicated, depending on the weapon and mounting system. A rail mount is the simplest solution for mounting the optic to a rifle, shotgun, PCC, or whatever. With a pistol, you’ll be attaching the optic directly to the slide.
When mounting an optic to a rail, you’ll want to ensure it does not wiggle even ever so slightly. Sometimes you’ll tighten down the optic’s mount significantly and still find some wiggle to it. You may need to adjust another portion of the mount. This is especially true when it comes to QD mounts.
Optics should not be mounted to the handguard. Handguards are not attached as securely to the barrel as the upper receiver. Also, if the handguard keeps hot, it will contract and expand, which can create some wiggle when contracting.
While you’ll be able to see and seemingly use the reticle while it’s mounted to the handguard, it’s not a wise idea. Albeit monolith AR receivers and handguards solve this problem, but they tend to be rare and expensive.
When mounting a red dot to a pistol, you’ll need to ensure the screws securing the optic to the slide are tight and secure. Depending on who does the milling, you may also need to ensure your screws are the correct length. On top of that, you’ll be well prepared to utilize a little Loctite to ensure those screws stay secure.
Step Two – Zeroing
Next, you need to hit the range with your chosen red dot and weapon platform. Zeroing is the act of changing the elevation (up and down) and the windage (left and right) of the reticle to ensure your rounds are hitting where the dot sits. It’s a fairly simple process, but there are different means to zero different weapons.
The basics of adjusting the red dot are simple. First, you set up at the range where you’ll zero your individual weapon. Get a good supported position and slowly fire one to three rounds. With a shotgun, it’s tough to fire more than a blast of buckshot and make adjustments. With rifles and pistols, it’s a fair bit easier to fire multiple rounds before you make adjustments.
Firing three rounds also ensures you are grouping in one consistent area. If you have one round hitting low and two rounds hitting left, you are probably grouping left, and that one round is just a flyer caused by an accuracy mistake.
Once you fire your rounds and see where you are hitting, it’s time to make adjustments. Most turrets have a U and an R and an arrow designating direction. U stands for Up, and R stands for Right. If you are hitting low, you adjust Up. If you are hitting high, you adjust down. The same goes for left and right. If your shots are landing left, then adjust right. Make these adjustments until you are on target.
How many adjustments or ‘clicks’ depends on your optic and range. Most utilize MOA as a measurement and often have .5 MOA adjustments. However, this will vary between optics, and it’s wise to read your manual.
Distance Matters
Let’s talk about the distances you should use to zero your optic depending on your weapon platform.
With a shotgun, you want to zero the load you plan to use most of the time to the dot. Slugs and buckshot handle differently and utilize different distances for zeroing. With buckshot, I would zero the optic at 15 yards or so. At that range, you’ll be covered for closer ranges and for distances out to 25 yards or so.
For slugs out of a smoothbore gun, a good zero range is 25 yards or so. This will allow you to take precise shots as far as 50 yards with minimal holdover. For a rifled shotgun barrel, you may be better suited with a magnified optic and 50 yard zero.
On a 5.56 rifle, I prefer what’s called a 50/200 yard zero. Essentially when you zero at 50 yards, the trajectory of the round doesn’t change until 200 yards. So from 50 to 200 yards, you use the same point of aim. It’s quite handy, but keep in mind it’s a generalized expectation. And could alter slightly between different barrel lengths and projectile weights. It’s not made for extreme precision but to engage threats at a multitude of ranges.
For different calibers, like 7.62×39, 308, etc., then you’ll need to do a bit of your own research. I could do several thousand words on the various zero schemes out there.
There will be deviation, but it’s slight and typically not a big deal when you are using a red dot. Red dots aren’t known for their precision capabilities like a magnified optic.
For handguns, I use a good bench rest zero at 10 yards. Ten yards will take me out to 25 yards, and on a man-sized target, it works quite well, even out to 50 yards.
Step Three – Practical Application
Once you have your optic mounted and zeroed, let’s get into the best way to use a red dot. We’ve all been taught the phrase “Front Sight Focus!” It’s drilled into us, and we believe that the target should be a little blurry, and the front sight should look sharp and clear.
Well, if you are shooting with a red dot, I’m gonna go ahead and need you to forget all that. Just drop it! The reason being the world of red dots. We don’t focus on the reticle and make the target blurry. Instead, we focus on the target and put the red dot where we need it to be. This makes shooting both more intuitive and much faster.
Being able to focus on the threat also provides a higher situational awareness of the target and potential other targets. You can move from target to target much quicker with a target focus. When you focus on the target, your red dot reticle will appear clear and crisp.
If you think about weapons throughout history, then target focus has always been the name of the game. With swords, spears, and the like, you’ve always focused on the threat or target, and that makes perfect sense with a firearm as well. However, it’s not really possible without a red dot.
You should also keep both eyes open when you shoot with a red dot. The dot will appear in your vision, and both eyes opened makes it much easier to retain peripheral vision.
Why am I Hitting Low At Close Range?
Let’s say you are handling your rifle and using a 50/200 zero. You’re getting some CQB training in at 15, 10, or heck even 7 yards, and all your shots are landing low. Do you need to re-zero? Is there some kind of problem?
Nope, you are experiencing something called mechanical offset, and it’s caused by the difference in distance between the sights and the bore. With a AR 15, the sight height is typically about 2.5 inches, and at close ranges, the 50/200-yard zero causes you to hit low at ultra-close ranges.
In most defensive shootings at this super close distance, the issue isn’t a big deal. You’ll be hitting a few inches low but still making hits. However, you probably want to be capable of taking precise close-range shots. To do so, you’ll need to aim a little high to compensate for the range.
Certain red dots offer a more complicated reticle that allows for this range estimation. Eotech and Holosun both use ring and dot reticles. If you utilize the bottom of the ring, you can instantly compensate for mechanical offset. The Romeo4T from SIG offers a ballistic dot reticle that allows you to compensate for ballistic drop and mechanical offset.
1. SIG Romeo 1 Pro
SIG Romeo 1 Pro
The Sig Sauer ROMEO1PRO brings a new level of durability and performance to the miniature open-reflex red dot sight
- Clarity A
- Shootability A-
- Reliability A
- Features A-
Our Grade
A
Reader’s Grade
B-
Based on 3 Reviews
Your Grade
Do You Own This Accessory? Leave A Review
Success Your Grade Has Been
Added To Our Reader’s Score
We use email to verify the accuracy of our reviews. We promise to never spam you.
Sig Romeo 1 Pro Specs
- Magnification 1X
- Objective Size 30mm
- Reticle Red Dot
- Dot Size 3 MOA
For Handguns – SIG Romeo 1 Pro
The SIG ROMEO1PRO is a massive handgun red dot, and it provides a huge window! You can choose between a 3 or 6 MOA reticle (we explain the benefits of each here), and you can use a metal shroud to protect the optic even more. You can also toss the metal shroud if you prefer a lighter optic.
The ROMEO1PRO is a tough as nails optic that I’ve beaten the hell out of in the course of the last few months. It’s kept ticking and kicking day in and day out. It’s an insanely clear optic with a bright and crisp reticle. It uses a Leupold footprint, so it’s rather easy to find pistol slides compatible with the footprint.
SIG Romeo 1 Pro Deals
$399.99
$399.99
$399.99
2. Holosun 507K

Holosun 507K
The sub-compact pistol sized Holosun HS507K-X2 Red Dot Sight provides a large field of view paired with useful features that will help you stay on target while greatly reducing target acquisition time.
- Clarity A
- Shootability B
- Reliability A
- Features B
Our Grade
A-
Reader’s Grade
Based on 5 Reviews
Your Grade
Do You Own This Accessory? Leave A Review
Success Your Grade Has Been
Added To Our Reader’s Score
We use email to verify the accuracy of our reviews. We promise to never spam you.
Holosun 507K Specs
- Magnification 1X
- Objective Size 0.58 x 0.77 in
- Reticle 2 MOA dot, 32 MOA circle
- Dot Size 2 MOA
For Subcompact Handguns – Holosun 507K
More and more subcompact pistols are coming optics ready, and there isn’t necessarily a ton of different optics out there for these little guns. Of the few optics on the market, the Holosun 507K is the very best. It’s super lightweight and sits low enough that a built-in rear notch acts as a rear sight.
The reticle varies between a 2 MOA dot, a 32 MOA circle, and a 32 MOA circle with 2 MOA dot. You can pick and choose whichever you want. I prefer the 32 MOA circle and Dot. It’s big, eye-catching, and perfect for close-quarters shooting. The Holosun has proven that it’s currently the toughest optic in the micro pistol class.
Holosun 507K Deals
3. Holosun 507C
Holosun 507C
The Holosun adds an open reflex design to your weapon for faster target acquisition and enhanced precision at close to medium-range encounters.
- Clarity B
- Shootability A+
- Reliability A
- Features A+
Our Grade
A
Reader’s Grade
A
Based on 15 Reviews
Your Grade
Do You Own This Accessory? Leave A Review
Success Your Grade Has Been
Added To Our Reader’s Score
We use email to verify the accuracy of our reviews. We promise to never spam you.
Holosun 507C Specs
- Magnification 1X
- Objective Size 0.63 x 0.91 in
- Reticle 2 MOA dot, 32 MOA circle
- Dot Size 2 MOA
For Shotguns – Holosun 507C
I know it’s another Holosun, but hear me out. The 507C features a 2 MOA dot, a 32 MOA circle, and a combination of the dot and circle. On a shotgun, I like the 32 MOA circle. This allows me to pattern my buckshot load inside the 32 MOA circle, so I know what distance sit exceeds the circle. It ensures I have accountability of all my pellets.
The 507C also uses the Trijicon footprint making it perfect for combining with a variety of different Picatinny mounts or flush-fitting optics mounts. It’s quite tough, can take a beating, and even comes with a solar panel. The Holosun 507C is extremely well made and actually pretty budget-friendly.
Holosun 507C Deals
4. AIMPOINT T2
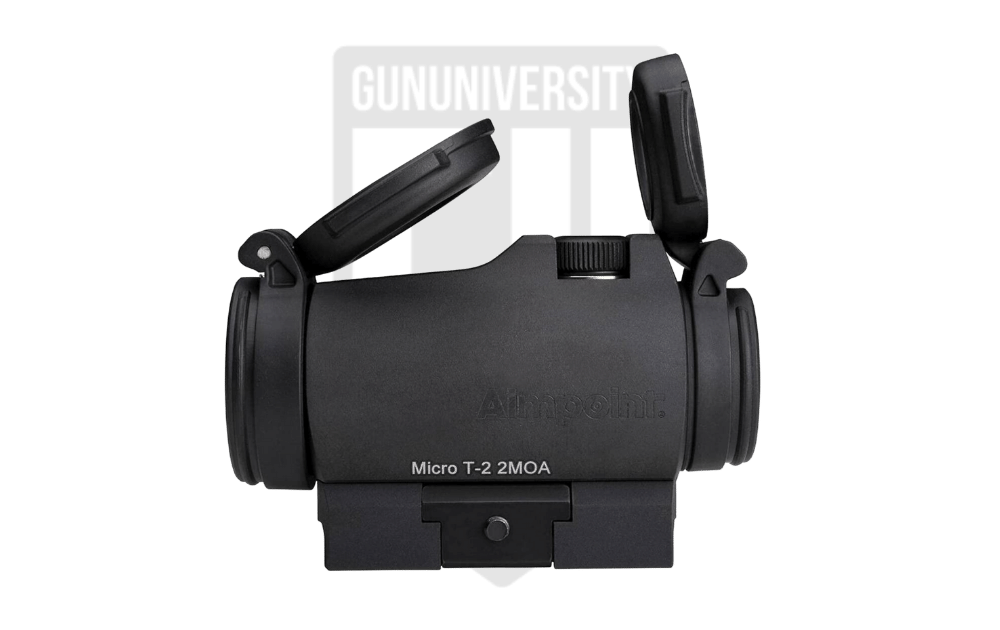
AIMPOINT T2
Aimpoint T2 provides a light weight and incredibly fast aiming point that will work with or without night vision and with new lens coatings it has unparalleled clarity.
- Clarity A
- Shootability A-
- Reliability A-
- Features B+
Our Grade
A-
Reader’s Grade
A+
Based on 2 Reviews
Your Grade
Do You Own This Accessory? Leave A Review
Success Your Grade Has Been
Added To Our Reader’s Score
We use email to verify the accuracy of our reviews. We promise to never spam you.
Aimpoint T2 Specs
- Magnification 1X
- Objective Size 18mm
- Reticle Red Dot
- Dot Size 2 MOA
For Carbines – Aimpoint T2
The Aimpoint T2 series provides a very small and lightweight red dot that’s easy to use and takes up very little rail space. I like my carbines short and light, so I like my optics light as well. The T2 offers you a super tough optic that’s been in use with American Special Operations for years now. The little T2 will take a beating and keep on keeping on.
It’s insanely easy to use and backed by the number 1 manufacturer of professional-grade red dots, Aimpoint. This would be a perfect optic for duty use or for home defense. It’s not cheap, but it’s worth every penny.
Aimpoint T2 Deals
$649.00
$779.99
Seeing Red
Red dots are quite easy to use and maintain. They are faster, more precise, and easier to use than iron sights. If you want to maximize your capabilities at close range, then a red dot is a must-have. Once you get behind one, I doubt you’ll ever want to go back to iron sights.
Pistol Red Dots
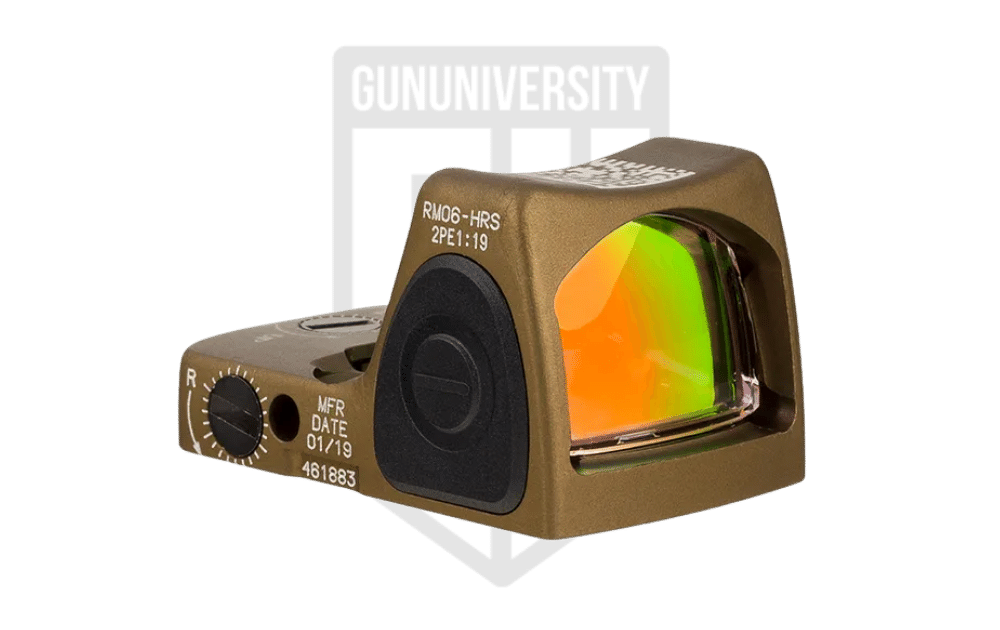
Our advice isn’t everything, so to add to what we spoke about above in this article, we’ve found an awesome video by John Lovell from Warrior Poet Society. In this video John gives us an overview of What is a Red Dot, How to mount a Red Dot with great tips to consider, also what Type, Size and brand that he recommends. I would highly recommend checking it out below.
In the video above John mentions the Trijicon RMR Type 2. Find out more about this optic below.
About Travis Pike
Travis Pike is a former U.S. Marine machine gunner who served five years with 2nd Battalion, 2nd Marines, including a deployment to Afghanistan. He is now an NRA-certified pistol instructor who teaches concealed carry, and covers guns and gear for Gun University as well as other firearms-industry outlets, including Pew Pew Tactical, AmmoLand, and The Armory Life. A self-professed "tactical hipster," he's happy to hear story ideas on Instagram.
Recent Posts


March 7, 2026

March 7, 2026

March 7, 2026